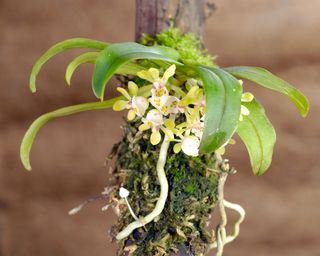
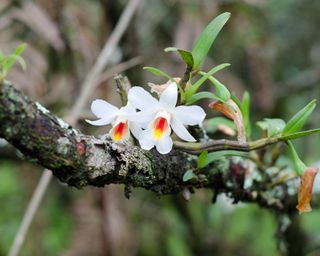
One of the most unique display techniques also mimics the plants’ natural growth habit. Mounted orchids are not grown in a container but on a flat rock, piece of bark, or other natural surface. The display mimics how they grow in their native range, but has an added orchid care benefit. Not understanding how to water orchids – and how often to do it – is one of the most common orchid care mistakes. However, mounted plants cannot be overwatered, which minimizes the risk of fungal diseases. Mounting an orchid is not difficult, and the plants make a beautiful display piece in a home. It is also an ideal way to present the plants in an orchid terrarium.
Which Orchids Can Be Mounted?
Numerous types of orchids are suitable for mounting – but not all of them. Sympodial orchids, which grow outward, are perfect for mounting, but monopodial types, which grow upward, may also be used. Many commonly grown orchids are epiphytic, meaning they grow in tree crotches and rock crevasses. Mounting them produces a very wild, and natural display. Sympodial orchids will spread out and grasp the mounting surface. Monopodial varieties will need significant support until they are established. The most commonly mounted epiphytic orchid types are Angraecum, Brassavola, Cattleya, Dendrobium, Oncidium, Phalaenopsis, Tolumnia, and Vanda. Certain orchid species, such as the rare ghost orchid Dendrophylax lindenii must be mounted to survive outside of their natural environment. Pseudobulb orchids can be more difficult to keep healthy in a mounted form, while epiphytic plants with aerial orchid roots take to the procedure easily.
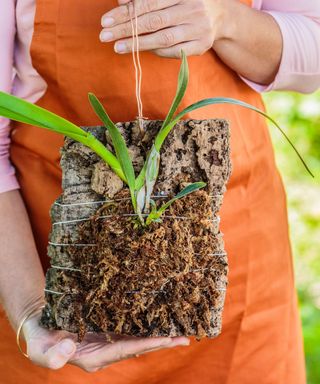
Suitable Mounting Structures
The type of orchid mount is important because some materials will provide more readily available organic material to nurture the plant. They will also vary in porosity, moisture retention, cost, and availability. Looking for a final splash of brightness to close out the growing season? Add fall color to your garden with these plants from the Gardening Know How Shop.
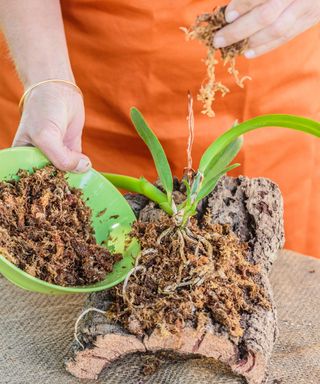
Cork is the most common material because it is inexpensive, easy to find, and pH neutral. It is also resilient and will last a long time.Non-organic materials, such as plastic, may be used but they do not offer moisture retention and organic benefits.Tree fern slabs are elegant and natural and will work on almost any type of orchid. However, they can be quite expensive.Driftwood makes an attractive display and is used by many growers. If you harvest it yourself, soak it several times to remove excess salt which could kill the orchid.Terracotta is an interesting choice. It is porous, easy to find, and inexpensive.Hardwood mounts like mesquite, dogwood, sassafras, and white oak are long-lasting. Avoid using treated wood or walnut. You can drill a hole in the item and fashion a hook to hang the mount or simply place it horizontally on a flat surface.Tree-mounting orchids is an option for gardeners in warmer regions.
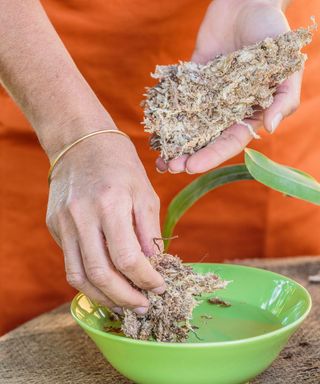
Additional Materials Required
You will need an organic material to house the roots and help bind the orchid to the mounting structure. Choose from:
Osmunda is a fiber derived from native North American ferns. It is slow to decompose. There are both hard and soft forms from which to choose.Sphagnum moss is also often part of the mounting material.Red fir bark chips in their smallest form are also common.Coconut fiber is an excellent choice for moisture retention.For any of these, you may want mesh or burlap bags to put the material into so it doesn’t fall out onto your floor and make a mess.
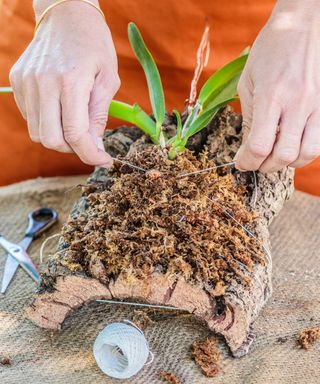
In addition, you will need wire or fishing line to actually tie the plant to the mounting structure along with pliers and needle nose snips.
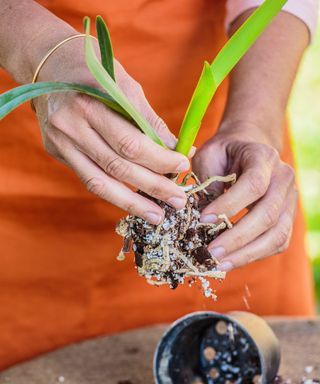
How to Mount an Orchid – Step-By-Step Guide
Start with a healthy, actively growing orchid. Avoid mounting an orchid when it has visible issues or is in dormancy. If you live in a warm region, you can mount the orchid to a tree. Choose a crotch just large enough to hold the roots and line it with moistened moss. Spread the roots into the moss and tie the orchid around the tree branch.
Caring for a Mounted Orchid
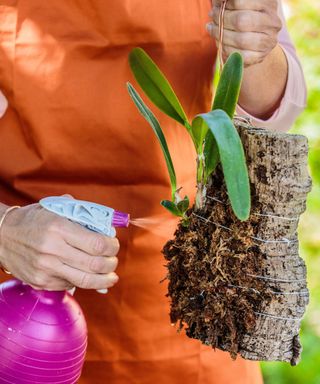
Right after mounting, move the orchid to a lower light situation than it would normally have. This will reduce stress as the plant attaches itself to the mount. Once it has begun to attach, move the mount to a position with brighter light. Mounted orchids will dry out much faster than potted plants, especially when placed outdoors or inside heated homes. It is more difficult to provide humidity to those species that enjoy it on a mount. When watering, the entire mount will need to be moved to the sink and soaked for several minutes. The best time of day to water is in the morning. Allow the moss to dry out a bit before soaking the mount again. Mist the plant roots daily but avoid the leaves, which could cause fungal disease if left wet. Spray the plant with liquid orchid fertilizer once per week during the growing season. To avoid salt build up, soak the mount and roots in distilled water once per week. Plants that grow vertically, like Phaelonopsis, may need staking.
Remounting an Overgrown Orchid
Orchids are fairly slow-growing, but in time the plant may outgrow its perch. If you need to mount it to a larger item, very carefully disentangle the wire or fishing line. Remove the old moss or fiber and soak the plant roots. Prune out anything that is not healthy. Get a larger mount and add the soaked moss, splayed roots, and more moss, tying the whole thing into place. Again, place the new mount in a lower-light area for a couple of weeks. Remounting can be difficult, so it is best to start with a mount that is large enough to accommodate normal mature plant size. This article features products available from third-party vendors on the Gardening Know How Shop.


title: “Mounting An Orchid Step By Step Guide For Stunning Displays” ShowToc: true date: “2024-10-09” author: “Ralph Bell”
One of the most unique display techniques also mimics the plants’ natural growth habit. Mounted orchids are not grown in a container but on a flat rock, piece of bark, or other natural surface. The display mimics how they grow in their native range, but has an added orchid care benefit. Not understanding how to water orchids – and how often to do it – is one of the most common orchid care mistakes. However, mounted plants cannot be overwatered, which minimizes the risk of fungal diseases. Mounting an orchid is not difficult, and the plants make a beautiful display piece in a home. It is also an ideal way to present the plants in an orchid terrarium.
Which Orchids Can Be Mounted?
Numerous types of orchids are suitable for mounting – but not all of them. Sympodial orchids, which grow outward, are perfect for mounting, but monopodial types, which grow upward, may also be used. Many commonly grown orchids are epiphytic, meaning they grow in tree crotches and rock crevasses. Mounting them produces a very wild, and natural display. Sympodial orchids will spread out and grasp the mounting surface. Monopodial varieties will need significant support until they are established. The most commonly mounted epiphytic orchid types are Angraecum, Brassavola, Cattleya, Dendrobium, Oncidium, Phalaenopsis, Tolumnia, and Vanda. Certain orchid species, such as the rare ghost orchid Dendrophylax lindenii must be mounted to survive outside of their natural environment. Pseudobulb orchids can be more difficult to keep healthy in a mounted form, while epiphytic plants with aerial orchid roots take to the procedure easily.
Suitable Mounting Structures
The type of orchid mount is important because some materials will provide more readily available organic material to nurture the plant. They will also vary in porosity, moisture retention, cost, and availability. Looking for a final splash of brightness to close out the growing season? Add fall color to your garden with these plants from the Gardening Know How Shop.
Cork is the most common material because it is inexpensive, easy to find, and pH neutral. It is also resilient and will last a long time.Non-organic materials, such as plastic, may be used but they do not offer moisture retention and organic benefits.Tree fern slabs are elegant and natural and will work on almost any type of orchid. However, they can be quite expensive.Driftwood makes an attractive display and is used by many growers. If you harvest it yourself, soak it several times to remove excess salt which could kill the orchid.Terracotta is an interesting choice. It is porous, easy to find, and inexpensive.Hardwood mounts like mesquite, dogwood, sassafras, and white oak are long-lasting. Avoid using treated wood or walnut. You can drill a hole in the item and fashion a hook to hang the mount or simply place it horizontally on a flat surface.Tree-mounting orchids is an option for gardeners in warmer regions.
Additional Materials Required
You will need an organic material to house the roots and help bind the orchid to the mounting structure. Choose from:
Osmunda is a fiber derived from native North American ferns. It is slow to decompose. There are both hard and soft forms from which to choose.Sphagnum moss is also often part of the mounting material.Red fir bark chips in their smallest form are also common.Coconut fiber is an excellent choice for moisture retention.For any of these, you may want mesh or burlap bags to put the material into so it doesn’t fall out onto your floor and make a mess.
In addition, you will need wire or fishing line to actually tie the plant to the mounting structure along with pliers and needle nose snips.
How to Mount an Orchid – Step-By-Step Guide
Start with a healthy, actively growing orchid. Avoid mounting an orchid when it has visible issues or is in dormancy. If you live in a warm region, you can mount the orchid to a tree. Choose a crotch just large enough to hold the roots and line it with moistened moss. Spread the roots into the moss and tie the orchid around the tree branch.
Caring for a Mounted Orchid
Right after mounting, move the orchid to a lower light situation than it would normally have. This will reduce stress as the plant attaches itself to the mount. Once it has begun to attach, move the mount to a position with brighter light. Mounted orchids will dry out much faster than potted plants, especially when placed outdoors or inside heated homes. It is more difficult to provide humidity to those species that enjoy it on a mount. When watering, the entire mount will need to be moved to the sink and soaked for several minutes. The best time of day to water is in the morning. Allow the moss to dry out a bit before soaking the mount again. Mist the plant roots daily but avoid the leaves, which could cause fungal disease if left wet. Spray the plant with liquid orchid fertilizer once per week during the growing season. To avoid salt build up, soak the mount and roots in distilled water once per week. Plants that grow vertically, like Phaelonopsis, may need staking.
Remounting an Overgrown Orchid
Orchids are fairly slow-growing, but in time the plant may outgrow its perch. If you need to mount it to a larger item, very carefully disentangle the wire or fishing line. Remove the old moss or fiber and soak the plant roots. Prune out anything that is not healthy. Get a larger mount and add the soaked moss, splayed roots, and more moss, tying the whole thing into place. Again, place the new mount in a lower-light area for a couple of weeks. Remounting can be difficult, so it is best to start with a mount that is large enough to accommodate normal mature plant size. This article features products available from third-party vendors on the Gardening Know How Shop.
title: “Mounting An Orchid Step By Step Guide For Stunning Displays” ShowToc: true date: “2024-09-25” author: “Lisa Biderman”
One of the most unique display techniques also mimics the plants’ natural growth habit. Mounted orchids are not grown in a container but on a flat rock, piece of bark, or other natural surface. The display mimics how they grow in their native range, but has an added orchid care benefit. Not understanding how to water orchids – and how often to do it – is one of the most common orchid care mistakes. However, mounted plants cannot be overwatered, which minimizes the risk of fungal diseases. Mounting an orchid is not difficult, and the plants make a beautiful display piece in a home. It is also an ideal way to present the plants in an orchid terrarium.
Which Orchids Can Be Mounted?
Numerous types of orchids are suitable for mounting – but not all of them. Sympodial orchids, which grow outward, are perfect for mounting, but monopodial types, which grow upward, may also be used. Many commonly grown orchids are epiphytic, meaning they grow in tree crotches and rock crevasses. Mounting them produces a very wild, and natural display. Sympodial orchids will spread out and grasp the mounting surface. Monopodial varieties will need significant support until they are established. The most commonly mounted epiphytic orchid types are Angraecum, Brassavola, Cattleya, Dendrobium, Oncidium, Phalaenopsis, Tolumnia, and Vanda. Certain orchid species, such as the rare ghost orchid Dendrophylax lindenii must be mounted to survive outside of their natural environment. Pseudobulb orchids can be more difficult to keep healthy in a mounted form, while epiphytic plants with aerial orchid roots take to the procedure easily.
Suitable Mounting Structures
The type of orchid mount is important because some materials will provide more readily available organic material to nurture the plant. They will also vary in porosity, moisture retention, cost, and availability. Looking for a final splash of brightness to close out the growing season? Add fall color to your garden with these plants from the Gardening Know How Shop.
Cork is the most common material because it is inexpensive, easy to find, and pH neutral. It is also resilient and will last a long time.Non-organic materials, such as plastic, may be used but they do not offer moisture retention and organic benefits.Tree fern slabs are elegant and natural and will work on almost any type of orchid. However, they can be quite expensive.Driftwood makes an attractive display and is used by many growers. If you harvest it yourself, soak it several times to remove excess salt which could kill the orchid.Terracotta is an interesting choice. It is porous, easy to find, and inexpensive.Hardwood mounts like mesquite, dogwood, sassafras, and white oak are long-lasting. Avoid using treated wood or walnut. You can drill a hole in the item and fashion a hook to hang the mount or simply place it horizontally on a flat surface.Tree-mounting orchids is an option for gardeners in warmer regions.
Additional Materials Required
You will need an organic material to house the roots and help bind the orchid to the mounting structure. Choose from:
Osmunda is a fiber derived from native North American ferns. It is slow to decompose. There are both hard and soft forms from which to choose.Sphagnum moss is also often part of the mounting material.Red fir bark chips in their smallest form are also common.Coconut fiber is an excellent choice for moisture retention.For any of these, you may want mesh or burlap bags to put the material into so it doesn’t fall out onto your floor and make a mess.
In addition, you will need wire or fishing line to actually tie the plant to the mounting structure along with pliers and needle nose snips.
How to Mount an Orchid – Step-By-Step Guide
Start with a healthy, actively growing orchid. Avoid mounting an orchid when it has visible issues or is in dormancy. If you live in a warm region, you can mount the orchid to a tree. Choose a crotch just large enough to hold the roots and line it with moistened moss. Spread the roots into the moss and tie the orchid around the tree branch.
Caring for a Mounted Orchid
Right after mounting, move the orchid to a lower light situation than it would normally have. This will reduce stress as the plant attaches itself to the mount. Once it has begun to attach, move the mount to a position with brighter light. Mounted orchids will dry out much faster than potted plants, especially when placed outdoors or inside heated homes. It is more difficult to provide humidity to those species that enjoy it on a mount. When watering, the entire mount will need to be moved to the sink and soaked for several minutes. The best time of day to water is in the morning. Allow the moss to dry out a bit before soaking the mount again. Mist the plant roots daily but avoid the leaves, which could cause fungal disease if left wet. Spray the plant with liquid orchid fertilizer once per week during the growing season. To avoid salt build up, soak the mount and roots in distilled water once per week. Plants that grow vertically, like Phaelonopsis, may need staking.
Remounting an Overgrown Orchid
Orchids are fairly slow-growing, but in time the plant may outgrow its perch. If you need to mount it to a larger item, very carefully disentangle the wire or fishing line. Remove the old moss or fiber and soak the plant roots. Prune out anything that is not healthy. Get a larger mount and add the soaked moss, splayed roots, and more moss, tying the whole thing into place. Again, place the new mount in a lower-light area for a couple of weeks. Remounting can be difficult, so it is best to start with a mount that is large enough to accommodate normal mature plant size. This article features products available from third-party vendors on the Gardening Know How Shop.
title: “Mounting An Orchid Step By Step Guide For Stunning Displays” ShowToc: true date: “2024-09-16” author: “Marlin Orduno”
One of the most unique display techniques also mimics the plants’ natural growth habit. Mounted orchids are not grown in a container but on a flat rock, piece of bark, or other natural surface. The display mimics how they grow in their native range, but has an added orchid care benefit. Not understanding how to water orchids – and how often to do it – is one of the most common orchid care mistakes. However, mounted plants cannot be overwatered, which minimizes the risk of fungal diseases. Mounting an orchid is not difficult, and the plants make a beautiful display piece in a home. It is also an ideal way to present the plants in an orchid terrarium.
Which Orchids Can Be Mounted?
Numerous types of orchids are suitable for mounting – but not all of them. Sympodial orchids, which grow outward, are perfect for mounting, but monopodial types, which grow upward, may also be used. Many commonly grown orchids are epiphytic, meaning they grow in tree crotches and rock crevasses. Mounting them produces a very wild, and natural display. Sympodial orchids will spread out and grasp the mounting surface. Monopodial varieties will need significant support until they are established. The most commonly mounted epiphytic orchid types are Angraecum, Brassavola, Cattleya, Dendrobium, Oncidium, Phalaenopsis, Tolumnia, and Vanda. Certain orchid species, such as the rare ghost orchid Dendrophylax lindenii must be mounted to survive outside of their natural environment. Pseudobulb orchids can be more difficult to keep healthy in a mounted form, while epiphytic plants with aerial orchid roots take to the procedure easily.
Suitable Mounting Structures
The type of orchid mount is important because some materials will provide more readily available organic material to nurture the plant. They will also vary in porosity, moisture retention, cost, and availability. Looking for a final splash of brightness to close out the growing season? Add fall color to your garden with these plants from the Gardening Know How Shop.
Cork is the most common material because it is inexpensive, easy to find, and pH neutral. It is also resilient and will last a long time.Non-organic materials, such as plastic, may be used but they do not offer moisture retention and organic benefits.Tree fern slabs are elegant and natural and will work on almost any type of orchid. However, they can be quite expensive.Driftwood makes an attractive display and is used by many growers. If you harvest it yourself, soak it several times to remove excess salt which could kill the orchid.Terracotta is an interesting choice. It is porous, easy to find, and inexpensive.Hardwood mounts like mesquite, dogwood, sassafras, and white oak are long-lasting. Avoid using treated wood or walnut. You can drill a hole in the item and fashion a hook to hang the mount or simply place it horizontally on a flat surface.Tree-mounting orchids is an option for gardeners in warmer regions.
Additional Materials Required
You will need an organic material to house the roots and help bind the orchid to the mounting structure. Choose from:
Osmunda is a fiber derived from native North American ferns. It is slow to decompose. There are both hard and soft forms from which to choose.Sphagnum moss is also often part of the mounting material.Red fir bark chips in their smallest form are also common.Coconut fiber is an excellent choice for moisture retention.For any of these, you may want mesh or burlap bags to put the material into so it doesn’t fall out onto your floor and make a mess.
In addition, you will need wire or fishing line to actually tie the plant to the mounting structure along with pliers and needle nose snips.
How to Mount an Orchid – Step-By-Step Guide
Start with a healthy, actively growing orchid. Avoid mounting an orchid when it has visible issues or is in dormancy. If you live in a warm region, you can mount the orchid to a tree. Choose a crotch just large enough to hold the roots and line it with moistened moss. Spread the roots into the moss and tie the orchid around the tree branch.
Caring for a Mounted Orchid
Right after mounting, move the orchid to a lower light situation than it would normally have. This will reduce stress as the plant attaches itself to the mount. Once it has begun to attach, move the mount to a position with brighter light. Mounted orchids will dry out much faster than potted plants, especially when placed outdoors or inside heated homes. It is more difficult to provide humidity to those species that enjoy it on a mount. When watering, the entire mount will need to be moved to the sink and soaked for several minutes. The best time of day to water is in the morning. Allow the moss to dry out a bit before soaking the mount again. Mist the plant roots daily but avoid the leaves, which could cause fungal disease if left wet. Spray the plant with liquid orchid fertilizer once per week during the growing season. To avoid salt build up, soak the mount and roots in distilled water once per week. Plants that grow vertically, like Phaelonopsis, may need staking.
Remounting an Overgrown Orchid
Orchids are fairly slow-growing, but in time the plant may outgrow its perch. If you need to mount it to a larger item, very carefully disentangle the wire or fishing line. Remove the old moss or fiber and soak the plant roots. Prune out anything that is not healthy. Get a larger mount and add the soaked moss, splayed roots, and more moss, tying the whole thing into place. Again, place the new mount in a lower-light area for a couple of weeks. Remounting can be difficult, so it is best to start with a mount that is large enough to accommodate normal mature plant size. This article features products available from third-party vendors on the Gardening Know How Shop.
title: “Mounting An Orchid Step By Step Guide For Stunning Displays” ShowToc: true date: “2024-10-17” author: “Ivan Birkline”
One of the most unique display techniques also mimics the plants’ natural growth habit. Mounted orchids are not grown in a container but on a flat rock, piece of bark, or other natural surface. The display mimics how they grow in their native range, but has an added orchid care benefit. Not understanding how to water orchids – and how often to do it – is one of the most common orchid care mistakes. However, mounted plants cannot be overwatered, which minimizes the risk of fungal diseases. Mounting an orchid is not difficult, and the plants make a beautiful display piece in a home. It is also an ideal way to present the plants in an orchid terrarium.
Which Orchids Can Be Mounted?
Numerous types of orchids are suitable for mounting – but not all of them. Sympodial orchids, which grow outward, are perfect for mounting, but monopodial types, which grow upward, may also be used. Many commonly grown orchids are epiphytic, meaning they grow in tree crotches and rock crevasses. Mounting them produces a very wild, and natural display. Sympodial orchids will spread out and grasp the mounting surface. Monopodial varieties will need significant support until they are established. The most commonly mounted epiphytic orchid types are Angraecum, Brassavola, Cattleya, Dendrobium, Oncidium, Phalaenopsis, Tolumnia, and Vanda. Certain orchid species, such as the rare ghost orchid Dendrophylax lindenii must be mounted to survive outside of their natural environment. Pseudobulb orchids can be more difficult to keep healthy in a mounted form, while epiphytic plants with aerial orchid roots take to the procedure easily.
Suitable Mounting Structures
The type of orchid mount is important because some materials will provide more readily available organic material to nurture the plant. They will also vary in porosity, moisture retention, cost, and availability. Looking for a final splash of brightness to close out the growing season? Add fall color to your garden with these plants from the Gardening Know How Shop.
Cork is the most common material because it is inexpensive, easy to find, and pH neutral. It is also resilient and will last a long time.Non-organic materials, such as plastic, may be used but they do not offer moisture retention and organic benefits.Tree fern slabs are elegant and natural and will work on almost any type of orchid. However, they can be quite expensive.Driftwood makes an attractive display and is used by many growers. If you harvest it yourself, soak it several times to remove excess salt which could kill the orchid.Terracotta is an interesting choice. It is porous, easy to find, and inexpensive.Hardwood mounts like mesquite, dogwood, sassafras, and white oak are long-lasting. Avoid using treated wood or walnut. You can drill a hole in the item and fashion a hook to hang the mount or simply place it horizontally on a flat surface.Tree-mounting orchids is an option for gardeners in warmer regions.
Additional Materials Required
You will need an organic material to house the roots and help bind the orchid to the mounting structure. Choose from:
Osmunda is a fiber derived from native North American ferns. It is slow to decompose. There are both hard and soft forms from which to choose.Sphagnum moss is also often part of the mounting material.Red fir bark chips in their smallest form are also common.Coconut fiber is an excellent choice for moisture retention.For any of these, you may want mesh or burlap bags to put the material into so it doesn’t fall out onto your floor and make a mess.
In addition, you will need wire or fishing line to actually tie the plant to the mounting structure along with pliers and needle nose snips.
How to Mount an Orchid – Step-By-Step Guide
Start with a healthy, actively growing orchid. Avoid mounting an orchid when it has visible issues or is in dormancy. If you live in a warm region, you can mount the orchid to a tree. Choose a crotch just large enough to hold the roots and line it with moistened moss. Spread the roots into the moss and tie the orchid around the tree branch.
Caring for a Mounted Orchid
Right after mounting, move the orchid to a lower light situation than it would normally have. This will reduce stress as the plant attaches itself to the mount. Once it has begun to attach, move the mount to a position with brighter light. Mounted orchids will dry out much faster than potted plants, especially when placed outdoors or inside heated homes. It is more difficult to provide humidity to those species that enjoy it on a mount. When watering, the entire mount will need to be moved to the sink and soaked for several minutes. The best time of day to water is in the morning. Allow the moss to dry out a bit before soaking the mount again. Mist the plant roots daily but avoid the leaves, which could cause fungal disease if left wet. Spray the plant with liquid orchid fertilizer once per week during the growing season. To avoid salt build up, soak the mount and roots in distilled water once per week. Plants that grow vertically, like Phaelonopsis, may need staking.
Remounting an Overgrown Orchid
Orchids are fairly slow-growing, but in time the plant may outgrow its perch. If you need to mount it to a larger item, very carefully disentangle the wire or fishing line. Remove the old moss or fiber and soak the plant roots. Prune out anything that is not healthy. Get a larger mount and add the soaked moss, splayed roots, and more moss, tying the whole thing into place. Again, place the new mount in a lower-light area for a couple of weeks. Remounting can be difficult, so it is best to start with a mount that is large enough to accommodate normal mature plant size. This article features products available from third-party vendors on the Gardening Know How Shop.
title: “Mounting An Orchid Step By Step Guide For Stunning Displays” ShowToc: true date: “2024-09-15” author: “Linda Lawson”
One of the most unique display techniques also mimics the plants’ natural growth habit. Mounted orchids are not grown in a container but on a flat rock, piece of bark, or other natural surface. The display mimics how they grow in their native range, but has an added orchid care benefit. Not understanding how to water orchids – and how often to do it – is one of the most common orchid care mistakes. However, mounted plants cannot be overwatered, which minimizes the risk of fungal diseases. Mounting an orchid is not difficult, and the plants make a beautiful display piece in a home. It is also an ideal way to present the plants in an orchid terrarium.
Which Orchids Can Be Mounted?
Numerous types of orchids are suitable for mounting – but not all of them. Sympodial orchids, which grow outward, are perfect for mounting, but monopodial types, which grow upward, may also be used. Many commonly grown orchids are epiphytic, meaning they grow in tree crotches and rock crevasses. Mounting them produces a very wild, and natural display. Sympodial orchids will spread out and grasp the mounting surface. Monopodial varieties will need significant support until they are established. The most commonly mounted epiphytic orchid types are Angraecum, Brassavola, Cattleya, Dendrobium, Oncidium, Phalaenopsis, Tolumnia, and Vanda. Certain orchid species, such as the rare ghost orchid Dendrophylax lindenii must be mounted to survive outside of their natural environment. Pseudobulb orchids can be more difficult to keep healthy in a mounted form, while epiphytic plants with aerial orchid roots take to the procedure easily.
Suitable Mounting Structures
The type of orchid mount is important because some materials will provide more readily available organic material to nurture the plant. They will also vary in porosity, moisture retention, cost, and availability. Looking for a final splash of brightness to close out the growing season? Add fall color to your garden with these plants from the Gardening Know How Shop.
Cork is the most common material because it is inexpensive, easy to find, and pH neutral. It is also resilient and will last a long time.Non-organic materials, such as plastic, may be used but they do not offer moisture retention and organic benefits.Tree fern slabs are elegant and natural and will work on almost any type of orchid. However, they can be quite expensive.Driftwood makes an attractive display and is used by many growers. If you harvest it yourself, soak it several times to remove excess salt which could kill the orchid.Terracotta is an interesting choice. It is porous, easy to find, and inexpensive.Hardwood mounts like mesquite, dogwood, sassafras, and white oak are long-lasting. Avoid using treated wood or walnut. You can drill a hole in the item and fashion a hook to hang the mount or simply place it horizontally on a flat surface.Tree-mounting orchids is an option for gardeners in warmer regions.
Additional Materials Required
You will need an organic material to house the roots and help bind the orchid to the mounting structure. Choose from:
Osmunda is a fiber derived from native North American ferns. It is slow to decompose. There are both hard and soft forms from which to choose.Sphagnum moss is also often part of the mounting material.Red fir bark chips in their smallest form are also common.Coconut fiber is an excellent choice for moisture retention.For any of these, you may want mesh or burlap bags to put the material into so it doesn’t fall out onto your floor and make a mess.
In addition, you will need wire or fishing line to actually tie the plant to the mounting structure along with pliers and needle nose snips.
How to Mount an Orchid – Step-By-Step Guide
Start with a healthy, actively growing orchid. Avoid mounting an orchid when it has visible issues or is in dormancy. If you live in a warm region, you can mount the orchid to a tree. Choose a crotch just large enough to hold the roots and line it with moistened moss. Spread the roots into the moss and tie the orchid around the tree branch.
Caring for a Mounted Orchid
Right after mounting, move the orchid to a lower light situation than it would normally have. This will reduce stress as the plant attaches itself to the mount. Once it has begun to attach, move the mount to a position with brighter light. Mounted orchids will dry out much faster than potted plants, especially when placed outdoors or inside heated homes. It is more difficult to provide humidity to those species that enjoy it on a mount. When watering, the entire mount will need to be moved to the sink and soaked for several minutes. The best time of day to water is in the morning. Allow the moss to dry out a bit before soaking the mount again. Mist the plant roots daily but avoid the leaves, which could cause fungal disease if left wet. Spray the plant with liquid orchid fertilizer once per week during the growing season. To avoid salt build up, soak the mount and roots in distilled water once per week. Plants that grow vertically, like Phaelonopsis, may need staking.
Remounting an Overgrown Orchid
Orchids are fairly slow-growing, but in time the plant may outgrow its perch. If you need to mount it to a larger item, very carefully disentangle the wire or fishing line. Remove the old moss or fiber and soak the plant roots. Prune out anything that is not healthy. Get a larger mount and add the soaked moss, splayed roots, and more moss, tying the whole thing into place. Again, place the new mount in a lower-light area for a couple of weeks. Remounting can be difficult, so it is best to start with a mount that is large enough to accommodate normal mature plant size. This article features products available from third-party vendors on the Gardening Know How Shop.
title: “Mounting An Orchid Step By Step Guide For Stunning Displays” ShowToc: true date: “2024-09-08” author: “James Campbell”
One of the most unique display techniques also mimics the plants’ natural growth habit. Mounted orchids are not grown in a container but on a flat rock, piece of bark, or other natural surface. The display mimics how they grow in their native range, but has an added orchid care benefit. Not understanding how to water orchids – and how often to do it – is one of the most common orchid care mistakes. However, mounted plants cannot be overwatered, which minimizes the risk of fungal diseases. Mounting an orchid is not difficult, and the plants make a beautiful display piece in a home. It is also an ideal way to present the plants in an orchid terrarium.
Which Orchids Can Be Mounted?
Numerous types of orchids are suitable for mounting – but not all of them. Sympodial orchids, which grow outward, are perfect for mounting, but monopodial types, which grow upward, may also be used. Many commonly grown orchids are epiphytic, meaning they grow in tree crotches and rock crevasses. Mounting them produces a very wild, and natural display. Sympodial orchids will spread out and grasp the mounting surface. Monopodial varieties will need significant support until they are established. The most commonly mounted epiphytic orchid types are Angraecum, Brassavola, Cattleya, Dendrobium, Oncidium, Phalaenopsis, Tolumnia, and Vanda. Certain orchid species, such as the rare ghost orchid Dendrophylax lindenii must be mounted to survive outside of their natural environment. Pseudobulb orchids can be more difficult to keep healthy in a mounted form, while epiphytic plants with aerial orchid roots take to the procedure easily.
Suitable Mounting Structures
The type of orchid mount is important because some materials will provide more readily available organic material to nurture the plant. They will also vary in porosity, moisture retention, cost, and availability. Looking for a final splash of brightness to close out the growing season? Add fall color to your garden with these plants from the Gardening Know How Shop.
Cork is the most common material because it is inexpensive, easy to find, and pH neutral. It is also resilient and will last a long time.Non-organic materials, such as plastic, may be used but they do not offer moisture retention and organic benefits.Tree fern slabs are elegant and natural and will work on almost any type of orchid. However, they can be quite expensive.Driftwood makes an attractive display and is used by many growers. If you harvest it yourself, soak it several times to remove excess salt which could kill the orchid.Terracotta is an interesting choice. It is porous, easy to find, and inexpensive.Hardwood mounts like mesquite, dogwood, sassafras, and white oak are long-lasting. Avoid using treated wood or walnut. You can drill a hole in the item and fashion a hook to hang the mount or simply place it horizontally on a flat surface.Tree-mounting orchids is an option for gardeners in warmer regions.
Additional Materials Required
You will need an organic material to house the roots and help bind the orchid to the mounting structure. Choose from:
Osmunda is a fiber derived from native North American ferns. It is slow to decompose. There are both hard and soft forms from which to choose.Sphagnum moss is also often part of the mounting material.Red fir bark chips in their smallest form are also common.Coconut fiber is an excellent choice for moisture retention.For any of these, you may want mesh or burlap bags to put the material into so it doesn’t fall out onto your floor and make a mess.
In addition, you will need wire or fishing line to actually tie the plant to the mounting structure along with pliers and needle nose snips.
How to Mount an Orchid – Step-By-Step Guide
Start with a healthy, actively growing orchid. Avoid mounting an orchid when it has visible issues or is in dormancy. If you live in a warm region, you can mount the orchid to a tree. Choose a crotch just large enough to hold the roots and line it with moistened moss. Spread the roots into the moss and tie the orchid around the tree branch.
Caring for a Mounted Orchid
Right after mounting, move the orchid to a lower light situation than it would normally have. This will reduce stress as the plant attaches itself to the mount. Once it has begun to attach, move the mount to a position with brighter light. Mounted orchids will dry out much faster than potted plants, especially when placed outdoors or inside heated homes. It is more difficult to provide humidity to those species that enjoy it on a mount. When watering, the entire mount will need to be moved to the sink and soaked for several minutes. The best time of day to water is in the morning. Allow the moss to dry out a bit before soaking the mount again. Mist the plant roots daily but avoid the leaves, which could cause fungal disease if left wet. Spray the plant with liquid orchid fertilizer once per week during the growing season. To avoid salt build up, soak the mount and roots in distilled water once per week. Plants that grow vertically, like Phaelonopsis, may need staking.
Remounting an Overgrown Orchid
Orchids are fairly slow-growing, but in time the plant may outgrow its perch. If you need to mount it to a larger item, very carefully disentangle the wire or fishing line. Remove the old moss or fiber and soak the plant roots. Prune out anything that is not healthy. Get a larger mount and add the soaked moss, splayed roots, and more moss, tying the whole thing into place. Again, place the new mount in a lower-light area for a couple of weeks. Remounting can be difficult, so it is best to start with a mount that is large enough to accommodate normal mature plant size. This article features products available from third-party vendors on the Gardening Know How Shop.
title: “Mounting An Orchid Step By Step Guide For Stunning Displays” ShowToc: true date: “2024-09-05” author: “Jackson Schmidt”
One of the most unique display techniques also mimics the plants’ natural growth habit. Mounted orchids are not grown in a container but on a flat rock, piece of bark, or other natural surface. The display mimics how they grow in their native range, but has an added orchid care benefit. Not understanding how to water orchids – and how often to do it – is one of the most common orchid care mistakes. However, mounted plants cannot be overwatered, which minimizes the risk of fungal diseases. Mounting an orchid is not difficult, and the plants make a beautiful display piece in a home. It is also an ideal way to present the plants in an orchid terrarium.
Which Orchids Can Be Mounted?
Numerous types of orchids are suitable for mounting – but not all of them. Sympodial orchids, which grow outward, are perfect for mounting, but monopodial types, which grow upward, may also be used. Many commonly grown orchids are epiphytic, meaning they grow in tree crotches and rock crevasses. Mounting them produces a very wild, and natural display. Sympodial orchids will spread out and grasp the mounting surface. Monopodial varieties will need significant support until they are established. The most commonly mounted epiphytic orchid types are Angraecum, Brassavola, Cattleya, Dendrobium, Oncidium, Phalaenopsis, Tolumnia, and Vanda. Certain orchid species, such as the rare ghost orchid Dendrophylax lindenii must be mounted to survive outside of their natural environment. Pseudobulb orchids can be more difficult to keep healthy in a mounted form, while epiphytic plants with aerial orchid roots take to the procedure easily.
Suitable Mounting Structures
The type of orchid mount is important because some materials will provide more readily available organic material to nurture the plant. They will also vary in porosity, moisture retention, cost, and availability. Looking for a final splash of brightness to close out the growing season? Add fall color to your garden with these plants from the Gardening Know How Shop.
Cork is the most common material because it is inexpensive, easy to find, and pH neutral. It is also resilient and will last a long time.Non-organic materials, such as plastic, may be used but they do not offer moisture retention and organic benefits.Tree fern slabs are elegant and natural and will work on almost any type of orchid. However, they can be quite expensive.Driftwood makes an attractive display and is used by many growers. If you harvest it yourself, soak it several times to remove excess salt which could kill the orchid.Terracotta is an interesting choice. It is porous, easy to find, and inexpensive.Hardwood mounts like mesquite, dogwood, sassafras, and white oak are long-lasting. Avoid using treated wood or walnut. You can drill a hole in the item and fashion a hook to hang the mount or simply place it horizontally on a flat surface.Tree-mounting orchids is an option for gardeners in warmer regions.
Additional Materials Required
You will need an organic material to house the roots and help bind the orchid to the mounting structure. Choose from:
Osmunda is a fiber derived from native North American ferns. It is slow to decompose. There are both hard and soft forms from which to choose.Sphagnum moss is also often part of the mounting material.Red fir bark chips in their smallest form are also common.Coconut fiber is an excellent choice for moisture retention.For any of these, you may want mesh or burlap bags to put the material into so it doesn’t fall out onto your floor and make a mess.
In addition, you will need wire or fishing line to actually tie the plant to the mounting structure along with pliers and needle nose snips.
How to Mount an Orchid – Step-By-Step Guide
Start with a healthy, actively growing orchid. Avoid mounting an orchid when it has visible issues or is in dormancy. If you live in a warm region, you can mount the orchid to a tree. Choose a crotch just large enough to hold the roots and line it with moistened moss. Spread the roots into the moss and tie the orchid around the tree branch.
Caring for a Mounted Orchid
Right after mounting, move the orchid to a lower light situation than it would normally have. This will reduce stress as the plant attaches itself to the mount. Once it has begun to attach, move the mount to a position with brighter light. Mounted orchids will dry out much faster than potted plants, especially when placed outdoors or inside heated homes. It is more difficult to provide humidity to those species that enjoy it on a mount. When watering, the entire mount will need to be moved to the sink and soaked for several minutes. The best time of day to water is in the morning. Allow the moss to dry out a bit before soaking the mount again. Mist the plant roots daily but avoid the leaves, which could cause fungal disease if left wet. Spray the plant with liquid orchid fertilizer once per week during the growing season. To avoid salt build up, soak the mount and roots in distilled water once per week. Plants that grow vertically, like Phaelonopsis, may need staking.
Remounting an Overgrown Orchid
Orchids are fairly slow-growing, but in time the plant may outgrow its perch. If you need to mount it to a larger item, very carefully disentangle the wire or fishing line. Remove the old moss or fiber and soak the plant roots. Prune out anything that is not healthy. Get a larger mount and add the soaked moss, splayed roots, and more moss, tying the whole thing into place. Again, place the new mount in a lower-light area for a couple of weeks. Remounting can be difficult, so it is best to start with a mount that is large enough to accommodate normal mature plant size. This article features products available from third-party vendors on the Gardening Know How Shop.
title: “Mounting An Orchid Step By Step Guide For Stunning Displays” ShowToc: true date: “2024-09-25” author: “Carole Tibbs”
One of the most unique display techniques also mimics the plants’ natural growth habit. Mounted orchids are not grown in a container but on a flat rock, piece of bark, or other natural surface. The display mimics how they grow in their native range, but has an added orchid care benefit. Not understanding how to water orchids – and how often to do it – is one of the most common orchid care mistakes. However, mounted plants cannot be overwatered, which minimizes the risk of fungal diseases. Mounting an orchid is not difficult, and the plants make a beautiful display piece in a home. It is also an ideal way to present the plants in an orchid terrarium.
Which Orchids Can Be Mounted?
Numerous types of orchids are suitable for mounting – but not all of them. Sympodial orchids, which grow outward, are perfect for mounting, but monopodial types, which grow upward, may also be used. Many commonly grown orchids are epiphytic, meaning they grow in tree crotches and rock crevasses. Mounting them produces a very wild, and natural display. Sympodial orchids will spread out and grasp the mounting surface. Monopodial varieties will need significant support until they are established. The most commonly mounted epiphytic orchid types are Angraecum, Brassavola, Cattleya, Dendrobium, Oncidium, Phalaenopsis, Tolumnia, and Vanda. Certain orchid species, such as the rare ghost orchid Dendrophylax lindenii must be mounted to survive outside of their natural environment. Pseudobulb orchids can be more difficult to keep healthy in a mounted form, while epiphytic plants with aerial orchid roots take to the procedure easily.
Suitable Mounting Structures
The type of orchid mount is important because some materials will provide more readily available organic material to nurture the plant. They will also vary in porosity, moisture retention, cost, and availability. Looking for a final splash of brightness to close out the growing season? Add fall color to your garden with these plants from the Gardening Know How Shop.
Cork is the most common material because it is inexpensive, easy to find, and pH neutral. It is also resilient and will last a long time.Non-organic materials, such as plastic, may be used but they do not offer moisture retention and organic benefits.Tree fern slabs are elegant and natural and will work on almost any type of orchid. However, they can be quite expensive.Driftwood makes an attractive display and is used by many growers. If you harvest it yourself, soak it several times to remove excess salt which could kill the orchid.Terracotta is an interesting choice. It is porous, easy to find, and inexpensive.Hardwood mounts like mesquite, dogwood, sassafras, and white oak are long-lasting. Avoid using treated wood or walnut. You can drill a hole in the item and fashion a hook to hang the mount or simply place it horizontally on a flat surface.Tree-mounting orchids is an option for gardeners in warmer regions.
Additional Materials Required
You will need an organic material to house the roots and help bind the orchid to the mounting structure. Choose from:
Osmunda is a fiber derived from native North American ferns. It is slow to decompose. There are both hard and soft forms from which to choose.Sphagnum moss is also often part of the mounting material.Red fir bark chips in their smallest form are also common.Coconut fiber is an excellent choice for moisture retention.For any of these, you may want mesh or burlap bags to put the material into so it doesn’t fall out onto your floor and make a mess.
In addition, you will need wire or fishing line to actually tie the plant to the mounting structure along with pliers and needle nose snips.
How to Mount an Orchid – Step-By-Step Guide
Start with a healthy, actively growing orchid. Avoid mounting an orchid when it has visible issues or is in dormancy. If you live in a warm region, you can mount the orchid to a tree. Choose a crotch just large enough to hold the roots and line it with moistened moss. Spread the roots into the moss and tie the orchid around the tree branch.
Caring for a Mounted Orchid
Right after mounting, move the orchid to a lower light situation than it would normally have. This will reduce stress as the plant attaches itself to the mount. Once it has begun to attach, move the mount to a position with brighter light. Mounted orchids will dry out much faster than potted plants, especially when placed outdoors or inside heated homes. It is more difficult to provide humidity to those species that enjoy it on a mount. When watering, the entire mount will need to be moved to the sink and soaked for several minutes. The best time of day to water is in the morning. Allow the moss to dry out a bit before soaking the mount again. Mist the plant roots daily but avoid the leaves, which could cause fungal disease if left wet. Spray the plant with liquid orchid fertilizer once per week during the growing season. To avoid salt build up, soak the mount and roots in distilled water once per week. Plants that grow vertically, like Phaelonopsis, may need staking.
Remounting an Overgrown Orchid
Orchids are fairly slow-growing, but in time the plant may outgrow its perch. If you need to mount it to a larger item, very carefully disentangle the wire or fishing line. Remove the old moss or fiber and soak the plant roots. Prune out anything that is not healthy. Get a larger mount and add the soaked moss, splayed roots, and more moss, tying the whole thing into place. Again, place the new mount in a lower-light area for a couple of weeks. Remounting can be difficult, so it is best to start with a mount that is large enough to accommodate normal mature plant size. This article features products available from third-party vendors on the Gardening Know How Shop.
title: “Mounting An Orchid Step By Step Guide For Stunning Displays” ShowToc: true date: “2024-09-24” author: “Veronica Clay”
One of the most unique display techniques also mimics the plants’ natural growth habit. Mounted orchids are not grown in a container but on a flat rock, piece of bark, or other natural surface. The display mimics how they grow in their native range, but has an added orchid care benefit. Not understanding how to water orchids – and how often to do it – is one of the most common orchid care mistakes. However, mounted plants cannot be overwatered, which minimizes the risk of fungal diseases. Mounting an orchid is not difficult, and the plants make a beautiful display piece in a home. It is also an ideal way to present the plants in an orchid terrarium.
Which Orchids Can Be Mounted?
Numerous types of orchids are suitable for mounting – but not all of them. Sympodial orchids, which grow outward, are perfect for mounting, but monopodial types, which grow upward, may also be used. Many commonly grown orchids are epiphytic, meaning they grow in tree crotches and rock crevasses. Mounting them produces a very wild, and natural display. Sympodial orchids will spread out and grasp the mounting surface. Monopodial varieties will need significant support until they are established. The most commonly mounted epiphytic orchid types are Angraecum, Brassavola, Cattleya, Dendrobium, Oncidium, Phalaenopsis, Tolumnia, and Vanda. Certain orchid species, such as the rare ghost orchid Dendrophylax lindenii must be mounted to survive outside of their natural environment. Pseudobulb orchids can be more difficult to keep healthy in a mounted form, while epiphytic plants with aerial orchid roots take to the procedure easily.
Suitable Mounting Structures
The type of orchid mount is important because some materials will provide more readily available organic material to nurture the plant. They will also vary in porosity, moisture retention, cost, and availability. Looking for a final splash of brightness to close out the growing season? Add fall color to your garden with these plants from the Gardening Know How Shop.
Cork is the most common material because it is inexpensive, easy to find, and pH neutral. It is also resilient and will last a long time.Non-organic materials, such as plastic, may be used but they do not offer moisture retention and organic benefits.Tree fern slabs are elegant and natural and will work on almost any type of orchid. However, they can be quite expensive.Driftwood makes an attractive display and is used by many growers. If you harvest it yourself, soak it several times to remove excess salt which could kill the orchid.Terracotta is an interesting choice. It is porous, easy to find, and inexpensive.Hardwood mounts like mesquite, dogwood, sassafras, and white oak are long-lasting. Avoid using treated wood or walnut. You can drill a hole in the item and fashion a hook to hang the mount or simply place it horizontally on a flat surface.Tree-mounting orchids is an option for gardeners in warmer regions.
Additional Materials Required
You will need an organic material to house the roots and help bind the orchid to the mounting structure. Choose from:
Osmunda is a fiber derived from native North American ferns. It is slow to decompose. There are both hard and soft forms from which to choose.Sphagnum moss is also often part of the mounting material.Red fir bark chips in their smallest form are also common.Coconut fiber is an excellent choice for moisture retention.For any of these, you may want mesh or burlap bags to put the material into so it doesn’t fall out onto your floor and make a mess.
In addition, you will need wire or fishing line to actually tie the plant to the mounting structure along with pliers and needle nose snips.
How to Mount an Orchid – Step-By-Step Guide
Start with a healthy, actively growing orchid. Avoid mounting an orchid when it has visible issues or is in dormancy. If you live in a warm region, you can mount the orchid to a tree. Choose a crotch just large enough to hold the roots and line it with moistened moss. Spread the roots into the moss and tie the orchid around the tree branch.
Caring for a Mounted Orchid
Right after mounting, move the orchid to a lower light situation than it would normally have. This will reduce stress as the plant attaches itself to the mount. Once it has begun to attach, move the mount to a position with brighter light. Mounted orchids will dry out much faster than potted plants, especially when placed outdoors or inside heated homes. It is more difficult to provide humidity to those species that enjoy it on a mount. When watering, the entire mount will need to be moved to the sink and soaked for several minutes. The best time of day to water is in the morning. Allow the moss to dry out a bit before soaking the mount again. Mist the plant roots daily but avoid the leaves, which could cause fungal disease if left wet. Spray the plant with liquid orchid fertilizer once per week during the growing season. To avoid salt build up, soak the mount and roots in distilled water once per week. Plants that grow vertically, like Phaelonopsis, may need staking.
Remounting an Overgrown Orchid
Orchids are fairly slow-growing, but in time the plant may outgrow its perch. If you need to mount it to a larger item, very carefully disentangle the wire or fishing line. Remove the old moss or fiber and soak the plant roots. Prune out anything that is not healthy. Get a larger mount and add the soaked moss, splayed roots, and more moss, tying the whole thing into place. Again, place the new mount in a lower-light area for a couple of weeks. Remounting can be difficult, so it is best to start with a mount that is large enough to accommodate normal mature plant size. This article features products available from third-party vendors on the Gardening Know How Shop.
title: “Mounting An Orchid Step By Step Guide For Stunning Displays” ShowToc: true date: “2024-09-12” author: “Joseph Nesslein”
One of the most unique display techniques also mimics the plants’ natural growth habit. Mounted orchids are not grown in a container but on a flat rock, piece of bark, or other natural surface. The display mimics how they grow in their native range, but has an added orchid care benefit. Not understanding how to water orchids – and how often to do it – is one of the most common orchid care mistakes. However, mounted plants cannot be overwatered, which minimizes the risk of fungal diseases. Mounting an orchid is not difficult, and the plants make a beautiful display piece in a home. It is also an ideal way to present the plants in an orchid terrarium.
Which Orchids Can Be Mounted?
Numerous types of orchids are suitable for mounting – but not all of them. Sympodial orchids, which grow outward, are perfect for mounting, but monopodial types, which grow upward, may also be used. Many commonly grown orchids are epiphytic, meaning they grow in tree crotches and rock crevasses. Mounting them produces a very wild, and natural display. Sympodial orchids will spread out and grasp the mounting surface. Monopodial varieties will need significant support until they are established. The most commonly mounted epiphytic orchid types are Angraecum, Brassavola, Cattleya, Dendrobium, Oncidium, Phalaenopsis, Tolumnia, and Vanda. Certain orchid species, such as the rare ghost orchid Dendrophylax lindenii must be mounted to survive outside of their natural environment. Pseudobulb orchids can be more difficult to keep healthy in a mounted form, while epiphytic plants with aerial orchid roots take to the procedure easily.
Suitable Mounting Structures
The type of orchid mount is important because some materials will provide more readily available organic material to nurture the plant. They will also vary in porosity, moisture retention, cost, and availability. Looking for a final splash of brightness to close out the growing season? Add fall color to your garden with these plants from the Gardening Know How Shop.
Cork is the most common material because it is inexpensive, easy to find, and pH neutral. It is also resilient and will last a long time.Non-organic materials, such as plastic, may be used but they do not offer moisture retention and organic benefits.Tree fern slabs are elegant and natural and will work on almost any type of orchid. However, they can be quite expensive.Driftwood makes an attractive display and is used by many growers. If you harvest it yourself, soak it several times to remove excess salt which could kill the orchid.Terracotta is an interesting choice. It is porous, easy to find, and inexpensive.Hardwood mounts like mesquite, dogwood, sassafras, and white oak are long-lasting. Avoid using treated wood or walnut. You can drill a hole in the item and fashion a hook to hang the mount or simply place it horizontally on a flat surface.Tree-mounting orchids is an option for gardeners in warmer regions.
Additional Materials Required
You will need an organic material to house the roots and help bind the orchid to the mounting structure. Choose from:
Osmunda is a fiber derived from native North American ferns. It is slow to decompose. There are both hard and soft forms from which to choose.Sphagnum moss is also often part of the mounting material.Red fir bark chips in their smallest form are also common.Coconut fiber is an excellent choice for moisture retention.For any of these, you may want mesh or burlap bags to put the material into so it doesn’t fall out onto your floor and make a mess.
In addition, you will need wire or fishing line to actually tie the plant to the mounting structure along with pliers and needle nose snips.
How to Mount an Orchid – Step-By-Step Guide
Start with a healthy, actively growing orchid. Avoid mounting an orchid when it has visible issues or is in dormancy. If you live in a warm region, you can mount the orchid to a tree. Choose a crotch just large enough to hold the roots and line it with moistened moss. Spread the roots into the moss and tie the orchid around the tree branch.
Caring for a Mounted Orchid
Right after mounting, move the orchid to a lower light situation than it would normally have. This will reduce stress as the plant attaches itself to the mount. Once it has begun to attach, move the mount to a position with brighter light. Mounted orchids will dry out much faster than potted plants, especially when placed outdoors or inside heated homes. It is more difficult to provide humidity to those species that enjoy it on a mount. When watering, the entire mount will need to be moved to the sink and soaked for several minutes. The best time of day to water is in the morning. Allow the moss to dry out a bit before soaking the mount again. Mist the plant roots daily but avoid the leaves, which could cause fungal disease if left wet. Spray the plant with liquid orchid fertilizer once per week during the growing season. To avoid salt build up, soak the mount and roots in distilled water once per week. Plants that grow vertically, like Phaelonopsis, may need staking.
Remounting an Overgrown Orchid
Orchids are fairly slow-growing, but in time the plant may outgrow its perch. If you need to mount it to a larger item, very carefully disentangle the wire or fishing line. Remove the old moss or fiber and soak the plant roots. Prune out anything that is not healthy. Get a larger mount and add the soaked moss, splayed roots, and more moss, tying the whole thing into place. Again, place the new mount in a lower-light area for a couple of weeks. Remounting can be difficult, so it is best to start with a mount that is large enough to accommodate normal mature plant size. This article features products available from third-party vendors on the Gardening Know How Shop.
title: “Mounting An Orchid Step By Step Guide For Stunning Displays” ShowToc: true date: “2024-09-09” author: “Thomas Sternberg”
One of the most unique display techniques also mimics the plants’ natural growth habit. Mounted orchids are not grown in a container but on a flat rock, piece of bark, or other natural surface. The display mimics how they grow in their native range, but has an added orchid care benefit. Not understanding how to water orchids – and how often to do it – is one of the most common orchid care mistakes. However, mounted plants cannot be overwatered, which minimizes the risk of fungal diseases. Mounting an orchid is not difficult, and the plants make a beautiful display piece in a home. It is also an ideal way to present the plants in an orchid terrarium.
Which Orchids Can Be Mounted?
Numerous types of orchids are suitable for mounting – but not all of them. Sympodial orchids, which grow outward, are perfect for mounting, but monopodial types, which grow upward, may also be used. Many commonly grown orchids are epiphytic, meaning they grow in tree crotches and rock crevasses. Mounting them produces a very wild, and natural display. Sympodial orchids will spread out and grasp the mounting surface. Monopodial varieties will need significant support until they are established. The most commonly mounted epiphytic orchid types are Angraecum, Brassavola, Cattleya, Dendrobium, Oncidium, Phalaenopsis, Tolumnia, and Vanda. Certain orchid species, such as the rare ghost orchid Dendrophylax lindenii must be mounted to survive outside of their natural environment. Pseudobulb orchids can be more difficult to keep healthy in a mounted form, while epiphytic plants with aerial orchid roots take to the procedure easily.
Suitable Mounting Structures
The type of orchid mount is important because some materials will provide more readily available organic material to nurture the plant. They will also vary in porosity, moisture retention, cost, and availability. Looking for a final splash of brightness to close out the growing season? Add fall color to your garden with these plants from the Gardening Know How Shop.
Cork is the most common material because it is inexpensive, easy to find, and pH neutral. It is also resilient and will last a long time.Non-organic materials, such as plastic, may be used but they do not offer moisture retention and organic benefits.Tree fern slabs are elegant and natural and will work on almost any type of orchid. However, they can be quite expensive.Driftwood makes an attractive display and is used by many growers. If you harvest it yourself, soak it several times to remove excess salt which could kill the orchid.Terracotta is an interesting choice. It is porous, easy to find, and inexpensive.Hardwood mounts like mesquite, dogwood, sassafras, and white oak are long-lasting. Avoid using treated wood or walnut. You can drill a hole in the item and fashion a hook to hang the mount or simply place it horizontally on a flat surface.Tree-mounting orchids is an option for gardeners in warmer regions.
Additional Materials Required
You will need an organic material to house the roots and help bind the orchid to the mounting structure. Choose from:
Osmunda is a fiber derived from native North American ferns. It is slow to decompose. There are both hard and soft forms from which to choose.Sphagnum moss is also often part of the mounting material.Red fir bark chips in their smallest form are also common.Coconut fiber is an excellent choice for moisture retention.For any of these, you may want mesh or burlap bags to put the material into so it doesn’t fall out onto your floor and make a mess.
In addition, you will need wire or fishing line to actually tie the plant to the mounting structure along with pliers and needle nose snips.
How to Mount an Orchid – Step-By-Step Guide
Start with a healthy, actively growing orchid. Avoid mounting an orchid when it has visible issues or is in dormancy. If you live in a warm region, you can mount the orchid to a tree. Choose a crotch just large enough to hold the roots and line it with moistened moss. Spread the roots into the moss and tie the orchid around the tree branch.
Caring for a Mounted Orchid
Right after mounting, move the orchid to a lower light situation than it would normally have. This will reduce stress as the plant attaches itself to the mount. Once it has begun to attach, move the mount to a position with brighter light. Mounted orchids will dry out much faster than potted plants, especially when placed outdoors or inside heated homes. It is more difficult to provide humidity to those species that enjoy it on a mount. When watering, the entire mount will need to be moved to the sink and soaked for several minutes. The best time of day to water is in the morning. Allow the moss to dry out a bit before soaking the mount again. Mist the plant roots daily but avoid the leaves, which could cause fungal disease if left wet. Spray the plant with liquid orchid fertilizer once per week during the growing season. To avoid salt build up, soak the mount and roots in distilled water once per week. Plants that grow vertically, like Phaelonopsis, may need staking.
Remounting an Overgrown Orchid
Orchids are fairly slow-growing, but in time the plant may outgrow its perch. If you need to mount it to a larger item, very carefully disentangle the wire or fishing line. Remove the old moss or fiber and soak the plant roots. Prune out anything that is not healthy. Get a larger mount and add the soaked moss, splayed roots, and more moss, tying the whole thing into place. Again, place the new mount in a lower-light area for a couple of weeks. Remounting can be difficult, so it is best to start with a mount that is large enough to accommodate normal mature plant size. This article features products available from third-party vendors on the Gardening Know How Shop.
